|
|
|
Who's Online
There currently are 5622 guests online. |
|
Categories
|
|
Information
|
|
Featured Product
|
|
|
 |
|
|
There are currently no product reviews.
 ;
I PURHASED THIS PRODUCT BECAUSE I WAS HAVING PROBLEMS WITH MY CDR20 HARMAN KARDON RECORDER. WHICH I PURCHASED NEW 12 YEARS AGO. AFTER REVIEWING THE MANUAL, I WAS ABLE TO ADJUST THE TENSIONER IN THE SYSTEM. WORKS LIKE A CHAMP!.
SAVED ME AT LEAST 100.00 WHICH WAS WHAT A SERVICE REPAIR STATION WANTED. GREAT MANUAL EASY TO READ. SPECIALLY AFTER I PRINTED THE PAGES WHICH DEALT WITH MY RECORDER. THANKS A LOT!!!!!!!!
 ;
You can fully trust on this one!
All the schematics are very crear an in one piece per page
;
I have never bought a service manual which is as competely readable as this althogh it was a scanned pdf. Thank you for this succesful manual also cheaper than other sites.
;
Thanks for a very good and readable servicemanual. Just what I needed as a "dinosaur technician". I really recommmend this site and will come back.
Åsbjörn
;
The manual I purchased was just what I needed. I was glad to find a site where I can find so many manuals on a wide variety of products.
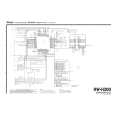
2 ADJUSTMENTS AND CHECKS
調��確�
2-1 Test Mode
In Standby mode, press and hold the stop + play + pause keys simultaneously for 5 seconds. The display will show the model name and the system controller�s version number, and the test mode is initiated. Press the stop key to exit from the test mode and return to the standby mode.
2-1 ������
ã�¹ã�¿ã�³ã��ã�¤ã�¢ã�¼ã��ã�®ç�¶æ��ã�§ã��stop ã�ã�¼ï¼� play ã�ã�¼ï¼� pause ã� ã�¼ã��5ç§�é��æ�¼ã��ç¶�ã��ã��ã�¨ã��表示é�¨ã�«æ©�種å��ã�¨ã�·ã�¹ã�³ã�³ã�® Version No. ã��表示ã��ã��ã��ã�¹ã��ã�¢ã�¼ã��ã�«å�¥ã��ã�� stop ã�ã�¼ã��æ�¼ã��ã�¨ã��ã��ã�¹ã��ã�¢ã�¼ã��ã�¯çµ�äº�ã��ã�¹ã�¿ã�³ã��ã�¤ã�¢ã�¼ã��ã�« æ�»ã��ã��
2-1-1 Front key check
1. Press the play key to enter the front key check mode. 2. The display shows the name of each key to be checked; press the corresponding key. When the check result of the key is OK, the display shows another key name. When the result is No Good, the display continues to show the same key name. 3. When all of the keys have been checked, the display shows "dial50". Check the multi jog dial to confirm that the displayed figure increases when the dial is rotated clockwise and decreases when it is rotated counterclockwise. 4. Press the play key to exit from the front key check mode and return to the Version number display mode.
2-1-1 ã��ã�ã�³ã��ã�ã�¼ã��ã�§ã��ã�¯
1. play ã�ã�¼ã��æ�¼ã��ã��ã��ã�ã�³ã��ã�ã�¼ã��ã�§ã��ã�¯ã�¢ã�¼ã��ã�«å�¥ã��ã�� 2. 表示é�¨ã�«ã��ã�§ã��ã�¯ã��ã��ã�ã�¼ã�®å��称ã��表示ã��ã��ã��ã�®ã�§ã��ã��ã�®ã� ã�¼ã��æ�¼ã��ã�� ã��ã�§ã��ã�¯OKã�ªã��次ã�®ã�ã�¼ã�®å��称ã��表示ã��ã��ã��NGã�ªã��表示ã�¯ å¤�å��ã��ã�ªã��ã�� 3. ä¸�é��ã��ã�ã�¼ã�®ç¢ºèª�ã��çµ�äº�ã��ã��ã�¨ã�� ã��ã�£ã�¹ã��ã�¬ã�¤ã�« â��dial50â�� ã�¨è¡¨ç¤ºã��ã��ã��ã��multi jog ã��å��ã��ã��表示ã�®æ�°å�ã��å�³å��ã��ã�§å¢�å� ã�� å·¦å��ã��ã�§æ¸�å°�ã��ã��ã��ã�¨ã��確èª�ã��ã��ã�� 4. play ã�ã�¼ã��æ�¼ã��ã�¨ã��ã��ã�ã�³ã��ã�ã�¼ã��ã�§ã��ã�¯ã�¢ã�¼ã��ã��çµ�äº�ã�� Version No. 表示ã�«æ�»ã��ã��
2-1-2 Display check
1. Press the display key to enter the display check mode. 2. Press display key a few times and ensure that each press lights the display blocks one after another. 3. When all the indicators are lit, press the display key to exit from the display check mode and return to the Version number display mode.
2-1-2 ����������
1. display ã�ã�¼ã��æ�¼ã��ã��ã��ã�£ã�¹ã��ã�¬ã�¤ã��ã�§ã��ã�¯ã�¢ã�¼ã��ã�«å�¥ã��ã�� 2. display ã�ã�¼ã��æ�¼ã��ã��ã�³ã�«ã��表示é�¨ã��ã��ã�ã��ã�¯ã��ã�¨ã�«ç�¹ç�¯ã�� ã�¦è¡�ã��ã��ã�¨ã��確èª�ã��ã��ã�� 3. 表示é�¨ã��å�¨ç�¹ç�¯ã��ã��ç�¶æ��ã��ã�� display ã�ã�¼ã��æ�¼ã��ã�¨ã��ã��ã�£ã�¹ ã��ã�¬ã�¤ã��ã�§ã��ã�¯ã�¢ã�¼ã��ã��çµ�äº�ã�� Version No. 表示ã�«æ�»ã��ã��
2-1-3 EEPROM default setting
1. Press the erase key. This writes the default values in the EEPROM and checks the written data. When the default data is written correctly, the display shows �EEPROM OK !!�. If not, it shows �EEPROM NG !!�. 2. Press the erase key again to return to the Version number display mode.
2-1-3 EEPROM ã��ã��ã�©ã�«ã��è¨å®�
1. erase ã�ã�¼ã��æ�¼ã��ã�� EEPROMã�«ã��ã��ã�©ã�«ã��å�¤ã��æ�¸ã��è¾¼ã�¿ã��è�ªå��ç��ã�«æ�¸ã��è¾¼ã�¿ã��ã�§ ã��ã�¯ã��è¡�ã��ã��ã��ã�®ã�¨ã��ã��æ£ã��ã��æ�¸ã��è¾¼ã��ã�¦ã��ã��ã�°ã��表示é�¨ã�« â��EEPROM OK !!â�� ã�¨è¡¨ç¤ºã��ã��ã��ä¸�è�¯ã�®å ´å��ã�¯ â��EEPROM NG !!â�� ã�¨è¡¨ç¤ºã��ã��ã��ã�� 2. å��度 erase ã�ã�¼ã��æ�¼ã��ã�¨ã��Version No. 表示ã�«æ�»ã��ã��
2-1-4 Total recording time display
1. When the record key is pressed, the display shows the time in which the pickup outputs the recording power (in the unit of hour). 2. Press the record key again to return to the Version number display mode.
2-1-4 ������表示
1. record ã�ã�¼ã��æ�¼ã��ã�¨ã��ã��ã��ã�¯ã�¢ã��ã��ã��è¨�é�²ã��ã�¯ã�¼ã��å�ºå��ã��ã�� æ��é��ã��表示ã��ã��ã�� ï¼�å��ä½�ï¼�hourï¼� 2. å��度 record ã�ã�¼ã��æ�¼ã��ã�¨ã��Version No. 表示ã�«æ�»ã��ã��
�3�
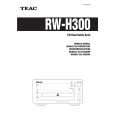 $4.99 RWH300 TEAC
Owner's Manual Complete owner's manual in digital format. The manual will be available for download as PDF file aft…
|
|
|
> |
|